We had the privilege of spending our morning with Katelyn Phillips, Studio Stylist at Juut’s Roseville salon. She was kind enough to walk us through the necessities for creating a beautiful blowout at home. Just in time for Friday night! First things first – THE PRODUCTS! While these aren’t all required, they will leave your hair looking and feeling its best.
AVEDA INVATI SCALP REVITALIZER. This product is a hair thickener and will do wonders for your strands over the long-haul, ultimately creating the fullest blowout. Part wet hair in sections and spray it on the scalp. Rub in and enjoy a cooling sensation!
AVEDA PURE ABUNDANCE STYLE PREP. Begin by shaking this friction activated spray. Mist it on wet hair to add volume and plump hair shafts.
AVEDA MEN LIQUID POMADE. This product is a personal favorite of Katelyn’s, however, any fixative product will do. In using the liquid pomade on wet hair, or other product that holds memory, you will add control and shine to your final look.
AVEDA DRY REMEDY OIL. Use two to four drops of this wonder product while your hair is still wet (we consider it miraculous). Work the product in your hair from mid-shaft to ends to seal the hair cuticle. This will eliminate frizz and flyaways upon blow-drying.
VELCRO ROLLERS + DUCKBILL CLIPS. The standard velcro rollers are great for adding additional volume to the crown of your head and can also be used to refresh your blowout on day two by blasting them with a blow-dryer. Use duckbill clips to secure the rollers while you complete the remainder of your blowout.
MASON PEARSON BRUSH. The long nylon bristles in this brush will give hair the lift it needs while the short bristles (boar bristles) will create tension.
CERAMIC ROUND BRUSH. A round brush is essential for completing a great at-home blowout. It will conduct heat, giving style versatility and adding body.
ON WITH THE SHOW! Here’s the rundown …
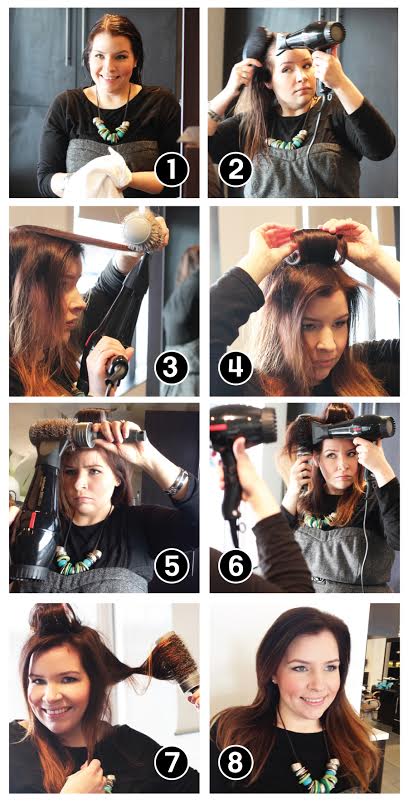
STEP ONE. Begin with adding your favorite (or ours) volumizing products to wet hair (we told you this would be easy).
STEP TWO. Brush your wet hair forward and brush it back to begin creating volume. Blowdry your hair until it is about 95% dry.
STEP THREE. Begin by separating a 2-inch by 2-inch section of hair on the crown of your head. The width of this section should be the same size as your velcro roller and include hair from both sides of your part. Over direct a portion of this section forward while round brushing.
STEP FOUR. Wrap your dry hair around the velcro roller and secure with a duckbill clip to secure. Repeat this step in same size section two to three times to cover the complete mid-crown of your head.
STEP FIVE. If you have any sort of fringe (bangs), use your round brush to completely dry them before moving on.
STEP SIX. Elongate your part so it runs down the back of your scalp. Gather the hair on the right side and move it forward toward your shoulder. Split the right-side section into two. Gather the hair on the left side of your part and move it forward toward your shoulder, also splitting this into two additional sections on your left-side. You should now have four sections of hair. Round brush these sections of hair while over-directing your hair forward.
STEP SEVEN. When you think the section is 100% dry, hit the cool-shot on your blow-dryer and spin the round brush counterclockwise while gently pulling your brush out. Repeat this step on each of the four sections.
STEP EIGHT. Ta-da! You look beautiful!!
On the days you’re not in the mood to DIY, stop your favorite JUUT salon location and we’ll bring out the Va-Va in your Voom with the absolute best blowouts & styles. In Minnesota, come to a JUUT Salon Spa in downtown Minneapolis, Uptown Minneapolis, Edina, Roseville, Wayzata, St. Paul or Woodbury.
In the Phoenix area, you have two JUUT salons to choose from, one in downtown Tempe and one in Scottsdale – in the Shops at Hilton Village.
If you’re in Palo Alto, you can visit our salon at University & Ramona.